How to Set Focus on a Control in CRM 2013 using javascript
Syntax:
Xrm.Page.getControl(arg).setFocus()
For instance,
Xrm.Page.getControl("creditlimit").setFocus();
Where creditlimit is the field name
Wednesday 30 October 2013
How to Show / Hide a Field / Control in CRM 2013 using javascript
With reference to CRM 2013 SDK,
Syntax:
Xrm.Page.getControl(arg).setVisible(bool)
For instance,
Xrm.Page.getControl("creditlimit").setVisible(true);
creditlimit is the attribute name
How to Set Requirement Level in CRM 2013 using javascript OR Required, Recommended Setting in CRM 2013 using javascript
In CRM 2013, we could set the requirement level on the attribute using javascript.
Syntax:
Xrm.Page.getAttribute(arg).setRequiredLevel(requirementLevel)
requirementLevel property could have any of the following 3 values.
- none
- required
- recommended
For instance,
Xrm.Page.getAttribute("creditlimit").setRequiredLevel("required");
Field Level Notification in CRM 2013 using javascript OR Control Level Notification in CRM 2013 using javascript
Version used for this post: CRM 2013 Online Trial
In CRM 2013, we could provide custom field level notifications. Lets see how could we do this. Please note that field level notification could be achieved using business rules as well.
Please refer the post :http://crmorion.blogspot.com/2013/10/business-rules-in-crm-2013-or-how-to.html
Scenario: We have Credit limit and Annual revenue fields on the Account form. If the user enters a credit limit value greater than annual income, we need to notify the user with a message that the credit limit shouldn't cross the Annual revenue value.
So we are going to do this using javascript.
Well, lets listen to CRM 2013 SDK for a moment.
"setNotification
Display a message near the control to indicate that data is not valid. When
this method is used on Microsoft Dynamics CRM for tablets a red "X" icon appears
next to the control. Tapping on the icon will display the message." ( Ref: CRM 2013 SDK )
Nota Bene: Setting a notification on a control will block the form from saving.
This means that if there is a notification, the user needs to resolve it first and then he / she would be able to save the form.
1. Firstly we need to define a javascript function in web resource. Either we could go to Solution ( Default solution ) --> Webresource --> Add web resource OR Update in an existing web resource OR Navigate to Account Form and then choose the field Credit Limit-->Field Properties--> Events -- > Add OR Modify Form Library
Account Form

Credit Limit Field

2. Here is the Javascript code. And its not a hard nut to crack

For our convenience, let's copy the code here
function SetCreditLimit()
{
var annualRevenue=Xrm.Page.getAttribute("revenue").getValue();
var creditLimit= Xrm.Page.getAttribute("creditlimit").getValue();
if(creditLimit > annualRevenue)
{
Xrm.Page.getControl("creditlimit").setNotification("Sorry, Credit Limit should be less than the Annual Income");
}
else
{
Xrm.Page.getControl("creditlimit").clearNotification();
}
}
Please note the key functions used in this javascript code.
setNotification - To display a notification about a control
clearNotification - To remove the notification about a control
In this scenario, we would like to have notification if the credit limit is more than the annual revenue otherwise we do not want to display any notification.
creditlimit and revenue are the field names.
After adding the js code, Save the webresource content.
3. The next step is to call this function on the onchange event of Credit limit field.

4. Next is our no-brainer, Press OK, Save the form and publish the form.
5. Now lets pick up a sample account to test. Please note the annual income value on it.

6. Lets key in some value in the Credit limit field and test the result. In this case, we could see a red X and if we move the cursor on it then we could see the message as shown below.

7. Also lets try to key in a value which is less than the annual income.

8. As we could see, there is no notification in this case and the user could save the record.
Saturday 19 October 2013
CRM 2013 app for Tablets
The following link from Microsoft Customer Center provides us the relevant information about the CRM 2013 app for tablets ( for windows 8 users and iPad users).
"http://www.microsoft.com/en-US/dynamics/crm-customer-center/crm-for-tablets-information-for-end-users.aspx"
( Ref: Microsoft Dynamice CRM 2013 Customer Centre)
"http://www.microsoft.com/en-US/dynamics/crm-customer-center/crm-for-tablets-information-for-end-users.aspx"
( Ref: Microsoft Dynamice CRM 2013 Customer Centre)
Getting Ready for Dynamics CRM 2013 Release
As you all know we are getting closer to the Dynamics CRM 2013 Release. Microsoft has provided all relevant information about the CRM 2013 release. In the below link, you could find
- Microsoft Dynamics CRM 2013 Global Premiere Event details
- Many useful ebooks such as new features, pricing info etc.
( Ref: Microsoft Dynamice CRM 2013 Customer Centre)
Sunday 13 October 2013
Phone Number Format in CRM 2013 OR How to Initiate Call from a Phone Number Field in CRM 2013
Related posts:
Lync Calls in CRM 2013
http://crmorion.blogspot.com/2013/10/lync-calls-from-crm-2013-or-how-to-make.html
Skype Calls in CRM 2013
http://crmorion.blogspot.com/2013/10/skype-calls-from-crm-2013-or-how-to.html
In CRM 2013, string attributes could be formatted to Phone number format. This is very useful when we need to make lync calls OR Skype calls.
Nota Bene: When we define a string with Phone Number Format, the field will contain a link to initiate the call ( Could be Lync OR Skype - Based on settings ). This means when the user clicks on the field value, CRM will initiate the call. Please refer the related posts for further details on this.
Lets see how could we define the phone number format.

Dependent Option Sets in CRM 2013 OR Cascading Option Sets in CRM 2013 OR How to configure Dependent Option Sets in CRM 2013 OR 3- tier Option Sets sample in CRM 2013
Please note that this post is the continuation of the post below.
2 - tier option sets sample ( This post also explains the basics )
http://crmorion.blogspot.com/2013/10/dependent-option-sets-in-crm-2013-or.html
In this post we would like to extend the logic using the sample given in CRM 2013 SDK to include one more option set. In simple words, 3 - tier option sets. Dependency of these 3 fields are shown below.

For instance, if a user selects Hardware, he /she would be able to see options Desktop / Laptop. And if Desktop is selected, the user would be able to see Workstation x1000 and Workstation x2000.
So we have 3 option sets
1. Category

2 . Sub Category

3. Type

Hope you had a look at
http://crmorion.blogspot.com/2013/10/dependent-option-sets-in-crm-2013-or.html
There are no changes to be done in the SDK.DependentOptionSet.js
SystemsOptionSetConfig.xml has to be amended with the new option set values as shown below.
<DependentOptionSetConfig entity="new_system" >
<ParentField id="new_category"
label="Category">
<DependentField id="new_subcategory"
label="Sub Category" />
<Option value="100000001"
label="Software">
<ShowOption value="100000000"
label="Business App" />
<ShowOption value="100000001"
label="OS" />
</Option>
<Option value="100000000"
label="Hardware">
<ShowOption value="100000002"
label="Desktop" />
<ShowOption value="100000003"
label="Laptop" />
</Option>
</ParentField>
<ParentField id="new_subcategory"
label="Sub Category">
<DependentField id="new_type"
label="Type" />
<Option value="100000000"
label="Business App">
<ShowOption value="100000000"
label="CRM" />
<ShowOption value="100000001"
label="HRM" />
</Option>
<Option value="100000001"
label="OS">
<ShowOption value="100000003"
label="Windows 7" />
<ShowOption value="100000002"
label="Windows 8" />
</Option>
<Option value="100000002"
label="Desktop">
<ShowOption value="100000004"
label="Workstation x1000" />
<ShowOption value="100000005"
label="Workstation x2000" />
</Option>
<Option value="100000003"
label="Laptop">
<ShowOption value="100000006"
label="Laptop T410" />
<ShowOption value="100000007"
label="Laptop T510" />
</Option>
</ParentField>
</DependentOptionSetConfig>
Nota Bene: In the above config xml file , we could see that in 2 places we defined parent field and the corresponding child field. And then corresponding values. The key advantages of this structure is that its extendable and also configurable.


We need to save and publish the form. Now get ready to see the magic.


Thank you CRM 2013 SDK !
2 - tier option sets sample ( This post also explains the basics )
http://crmorion.blogspot.com/2013/10/dependent-option-sets-in-crm-2013-or.html
In this post we would like to extend the logic using the sample given in CRM 2013 SDK to include one more option set. In simple words, 3 - tier option sets. Dependency of these 3 fields are shown below.

For instance, if a user selects Hardware, he /she would be able to see options Desktop / Laptop. And if Desktop is selected, the user would be able to see Workstation x1000 and Workstation x2000.
So we have 3 option sets
1. Category

2 . Sub Category

3. Type

Hope you had a look at
http://crmorion.blogspot.com/2013/10/dependent-option-sets-in-crm-2013-or.html
There are no changes to be done in the SDK.DependentOptionSet.js
SystemsOptionSetConfig.xml has to be amended with the new option set values as shown below.
<DependentOptionSetConfig entity="new_system" >
<ParentField id="new_category"
label="Category">
<DependentField id="new_subcategory"
label="Sub Category" />
<Option value="100000001"
label="Software">
<ShowOption value="100000000"
label="Business App" />
<ShowOption value="100000001"
label="OS" />
</Option>
<Option value="100000000"
label="Hardware">
<ShowOption value="100000002"
label="Desktop" />
<ShowOption value="100000003"
label="Laptop" />
</Option>
</ParentField>
<ParentField id="new_subcategory"
label="Sub Category">
<DependentField id="new_type"
label="Type" />
<Option value="100000000"
label="Business App">
<ShowOption value="100000000"
label="CRM" />
<ShowOption value="100000001"
label="HRM" />
</Option>
<Option value="100000001"
label="OS">
<ShowOption value="100000003"
label="Windows 7" />
<ShowOption value="100000002"
label="Windows 8" />
</Option>
<Option value="100000002"
label="Desktop">
<ShowOption value="100000004"
label="Workstation x1000" />
<ShowOption value="100000005"
label="Workstation x2000" />
</Option>
<Option value="100000003"
label="Laptop">
<ShowOption value="100000006"
label="Laptop T410" />
<ShowOption value="100000007"
label="Laptop T510" />
</Option>
</ParentField>
</DependentOptionSetConfig>
Nota Bene: In the above config xml file , we could see that in 2 places we defined parent field and the corresponding child field. And then corresponding values. The key advantages of this structure is that its extendable and also configurable.
Function calls to be done are explained in
Additional function call to be done is on the Sub Category.
id est : When the user selects the Sub Category, the Type option set to be filtered based on dependency.
We need to do the function call on the OnChange event of Sub Category. So lets click on Add.

Function: SDK.DependentOptionSet.filterDependentField
Parameters : "new_subcategory", "new_type"

Okay and press Okay
We need to save and publish the form. Now get ready to see the magic.


Thank you CRM 2013 SDK !
Dependent Option Sets in CRM 2013 OR Cascading Option Sets in CRM 2013 OR How to configure Dependent Option Sets in CRM 2013 OR 2- tier Option Sets sample in CRM 2013
Version used for this post : CRM 2013 Online trial
Lets consider a scenario.
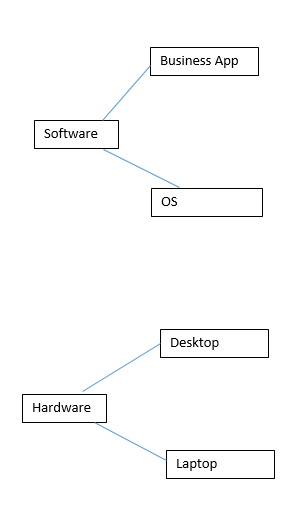
We have a custom entity called Systems. And it has 2 option sets.
1. Category- Values - Software, Hardware
2. Sub Category - Values - Business App, OS, Desktop and Laptop.
The option set values are dependent as shown in the below diagram.
For instance, when we select Software we should only see Business App and OS.
Firstly we need to understand the steps to be done for this functionality. From a helicopter view,
- Option sets should be defined with necessary values.
- XML Config file ( Here we define the dependency, sample is given below. We need to upload this file as a webresource)
- SDK.DependentOptionSet.js ( Could be found in SDK\SampleCode\JS\FormScripts . We need to upload this file as a webresource)
- Js function calls to be done.
1. Lets have a quick look at the option sets.
Category:

Sub Category:

2. The next step is to configure the xml file. Its based on the option set values as shown below.
Here is the contents of our XML file - SystemsOptionSetConfig.xml
<DependentOptionSetConfig entity="new_system" >
<ParentField id="new_category"
label="Category">
<DependentField id="new_subcategory"
label="Sub Category" />
<Option value="100000001"
label="Software">
<ShowOption value="100000000"
label="Business App" />
<ShowOption value="100000001"
label="OS" />
</Option>
<Option value="100000000"
label="Hardware">
<ShowOption value="100000002"
label="Desktop" />
<ShowOption value="100000003"
label="Laptop" />
</Option>
</ParentField>
</DependentOptionSetConfig>
Entity name, field names and values should be defined correctly. Also structure is important as the SDK dependent option set js works based on this.
Here Parent field is Category and the dependent field is Sub Category. Dependency is defined in terms of Option and Showoption.
Here Parent field is Category and the dependent field is Sub Category. Dependency is defined in terms of Option and Showoption.
3. We need to double check the values, as the dependency is purely defined in the above xml.
4. Lets upload the xml config file. Please note that the name of the webresource xml is "new_SystemsOptionSetConfig.xml". After save operation, we need to publish the webresource.
 5. We need to upload the SDK.DependentOptionSet.js ( located in SDK\SampleCode\JS\FormScripts ) as a webresource. The next step is to save and publish this webresource. Please note that the name of this js file is new_SDK.DependentOptionSet.js. This js file is the core of this functionality.
 6. Next step is to configure form. So lets navigate to System entity form.We need to add our core js code to the Form Library. as shown below.

7. Function call on the OnLoad event is the next step. We need to click on the Add button found on the Functions section. So here the function is SDK.DependentOptionSet.init and parameter is our xml config name "new_SystemsOptionSetConfig.xml"

8. So our Form onload event looks like this.

9. As the next step we need to configure the function call on the OnChange event of the parent field ( here its Category)
For instance, When we change the Category value, the Sub Category should be populated accordingly.
So double click on the field found on the form design. And click on the Add button as shown below. In this case, we do not need to add Form library as it was added earlier.

10. Here the function call is
SDK.DependentOptionSet.filterDependentField
And parameters are "new_category","new_subcategory"

lets say Okay and press Okay. And our final step is Save the form and publish the form.
11. During testing it was found there was a small syntax error in the SDK.DependentOptionSet.js file. (One curly bracket was extra. So we need to comment it. Please note that the SDK was Downloaded on 12/10/2013.) Hopefully this will be resolved in the upcoming SDK release. For our convenience, its explained here. This change could be done either before saving it as webresource OR by editing the webresource. The change is highlighted below.

12. And here is our final apple pie.


13 . In future , if we have some change in the option set values or if we need to append some option set values, all we need to do is amend the option set field in CRM and then update the xml configuration webresource file accordingly. No change required in the js file.
Saturday 12 October 2013
Microsoft Dynamics CRM 2013 Report Authoring Extension (with SQL Server Data Tools support)
CRM 2013 Report Authoring Extension is useful when we need to develop custom fetch xml based reports using Business Intelligence Development Studio.
Microsoft Dynamics CRM 2013 Report Authoring Extension (with SQL Server Data Tools support) could be downloaded from the below link.
http://www.microsoft.com/en-us/download/details.aspx?id=40343
Microsoft Dynamics CRM 2013 Report Authoring Extension (with SQL Server Data Tools support) could be downloaded from the below link.
http://www.microsoft.com/en-us/download/details.aspx?id=40343
Microsoft Dynamics CRM 2013 Helpful Resources
CRM 2013 helpful resources, all in one place. ( Training , downloads, free trials, implementation ) . Highly recommended !
https://curah.microsoft.com/31635/microsoft-dynamics-crm-2013-helpful-resources
CRM 2013 Customer Center, Implementation Guide and SDK
CRM 2013 Customer Center, Implementation Guide and SDK could be found in the following link.
http://blogs.msdn.com/b/crm/archive/2013/10/11/announcing-the-crm-2013-customer-center-implementation-guide-and-sdk.aspx
Friday 11 October 2013
Microsoft Dynamics CRM 2013 Custom Code Validation Tool
Well, CRM 2013 SDK explains it in the best way.
"The Microsoft Dynamics CRM 2013 Custom Code Validation Tool is a managed solution that you can install and run to inspect your web resources for issues that might cause your scripts to break with this release. This is a valuable resource to assist in locating potential problems" ( Ref : CRM 2013 SDK )
CRM 2013 Custom code validation tool could be downloaded from the following link.
http://www.microsoft.com/en-us/download/details.aspx?id=30151
Thursday 10 October 2013
Notes in CRM 2013
1. Our no-brainer is here - Account record.

2. Lets create a sample note. We need to provide a title and then notes ( in CRM 2011, the title of notes was automatically populated) . As before, we also have the option to attach a file to the note.

3. Please note that we have the options to remove notes / attachments quickly. Also CRM displays who created the notes and when it was created. Editing an existing notes is also very easy. Its nothing but inline editing. It could be done by just clicking on it.

Wednesday 9 October 2013
Quick Create Forms in CRM 2013 OR How to display Quick Create Form for Custom Entities in CRM 2013
Version used for this post : CRM 2013 Online trial
As you all know Quick Create Form is a nice a feature in CRM 2011. Lets learn the ropes of Quick Create Form in CRM 2013.
In order to get a better idea, lets consider a custom entity called Budget.
So we aim to bring the quick create form for Budget in the Quick create Area as shown below.

1. Firstly we need to do the following Setting on the entity (Budget in this context).
Settings --> Customizations --> Customize the System--> Default Solution ( OR your custom Solution in which Budget entity [ custom entity] exists) -->Budget entity
Tick the check box Allow Quick Create. Please note that this property ( Allow Quick Create) could be updated any time. As you know there are some attributes which can not be updated after the entity creation.

2. Next step is to create a Quick Create Form. Lets navigate to Budget entity --> Forms
And select New Quick Create Form as shown below.
And select New Quick Create Form as shown below.

3. In simple words, we could place the most necessary fields of the entity on the Quick Create Form. In this case just name is alright. The next step is our usual CRM no-brainer , SAVE the form and Publish.

4. When we click on the Create we could see the option to create Budget Quick Create Form.

5. And it opens our sample Quick Create Form in CRM 2013.

Monday 7 October 2013
Quick View Forms in CRM 2013 OR How to place Quick View Form in CRM 2013 OR Quick View Form Control in CRM 2013
Version used for this post: CRM 2013 online trial.
Its good to learn the ropes of the quick view forms available in CRM 2013. It is possible to add quick view forms for the custom entities as well.
Using Quick View Forms, we could see associated data. Quick view forms could be embedded in a Main form.
Our ball is ready. So lets get it rolling.
1. Lets consider our no-brainer, Account record. Please note the highlighted Primary contact section. Its possible to search contacts here.

2. So lets search a contact and it would bring the contact if it exists. Also note that its possible to create a new contact by clicking on the New button. Now lets select the contact.


3. We could see a little form appeared. That's nothing but a contact quick view form.

4. Next step is to understand how the quick view form is configured in CRM 2013 and How could we place a quick view form in CRM 2013.
5. Lets navigate to Accounts form design.
Settings --> Customizations --> Customize the System--> Default Solution ( OR your custom Solution in which Account entity exists) -->Account entity-->Forms
Please note the following items on the form

6. Here is our major component, Quick view control.

7. Lets click on the Edit button to see the selected Quick view form, account contact card. And here is the design of the Quick View Form - Account Contact Card. We could also find this Quick View form in Solution-->Contact entity-->Forms


4. Next step is to understand how the quick view form is configured in CRM 2013 and How could we place a quick view form in CRM 2013.
5. Lets navigate to Accounts form design.
Settings --> Customizations --> Customize the System--> Default Solution ( OR your custom Solution in which Account entity exists) -->Account entity-->Forms
Please note the following items on the form
- Quick View Form Control button - When we need to place a quick view form on another form, we need to INSERT Quick View Form Control ( In simple words, A placeholder for Quick View Form)
- Quick View Form control that's already on the Account form design. Lets double click on the existing Quick View Form control.

6. Here is our major component, Quick view control.
- The Quick View Form is based on a lookup field.
- Related entity should be selected.
- And then Quick View Form should be selected
- Its also possible to edit the associated Quick View Form.

7. Lets click on the Edit button to see the selected Quick view form, account contact card. And here is the design of the Quick View Form - Account Contact Card. We could also find this Quick View form in Solution-->Contact entity-->Forms

8. Please note that its possible to create multiple Quick View Forms for System entities as well as custom entities.


Sunday 6 October 2013
How to Close a Form in CRM 2013 using javascript
With reference to CRM 2013 SDK, following is the code snippet to close the form.
Xrm.Page.ui.close();
Please note the following important points.
"The HTML Window.close method is suppressed. To close a form window you must use this method. If there are any unsaved changes in the form the user will be prompted whether they want to save their changes before the window closes." ( Ref: CRM 2013 SDK )
Whereas if we need to save the record using javascript, we could use the same methods whichwe were using in CRM 2011.
Xrm.Page.data.entity.save( null | "saveandclose" |"saveandnew" );
Arguments values:

save()
If no parameter is included the record will simply be saved. This is the equivalent of using the Save command.

save("saveandclose")
This is the equivalent of using the Save and Close command.

save("saveandnew")
This is the equivalent of the using the Save and New command.
( Ref: CRM 2013 SDK )
How to get the Base URL value in CRM 2013 using javascript OR How to get the Server URL in CRM 2013 using javascript
With reference to CRM 2013 SDK, please note that the js method context.getServerUrl() which was widely used in CRM 2011 is deprecated in CRM 2013. So we need to use the following method instead to retrieve the base URL value.
var baseURL = Xrm.Page.context.getClientUrl();
The values Returned:
var baseURL = Xrm.Page.context.getClientUrl();
The values Returned:
Client
|
Value
|
Microsoft Dynamics CRM (on-premises)
|
http(s)://server/org
|
Microsoft Dynamics CRM Online
|
https://org.crm.dynamics.com
|
Microsoft Dynamics CRM for Outlook with Offline Access when offline
|
http://localhost:2525
|
Ref: ( CRM 2013 SDK )
Subscribe to:
Posts (Atom)